
BANDAGES
Description : A bandage is a piece of material used either to support a medical device such as a dressing or splint, or on its own to provide support to the body; it can also be used to restrict a part of the body.
ROLLER BANDAGE


The length and breadth of the bandage depends up on the intensity of the wound. Roller bandages are of different length and breadth. Roller bandages are kept safely by rolling it. It can be applicable to almost all wounds affected in human body. Elastic Crape Bandage It is applicable to the part of human body which is affected by sprain. This is used to cover the swelling parts.
| Part to be bandaged | Required Width |
| Finger | 2.5 cm (1 inch) |
| Hand | 5 cm (2 inch) |
| Arm | 5 or 6 cm (2 or 2.50 inch) |
| Leg | 7.5 or 9 cm (3 or 3.5 inch) |
| Trunk | 10 or 15 cm (4 or 6inch) |


TRIANGULAR BANDAGES
A first aid kit the most important particle is triangular bandage. This is a large and triangular pieces of material. The triangular bandage two sides about 1 meter long and third about 1.4 meters.
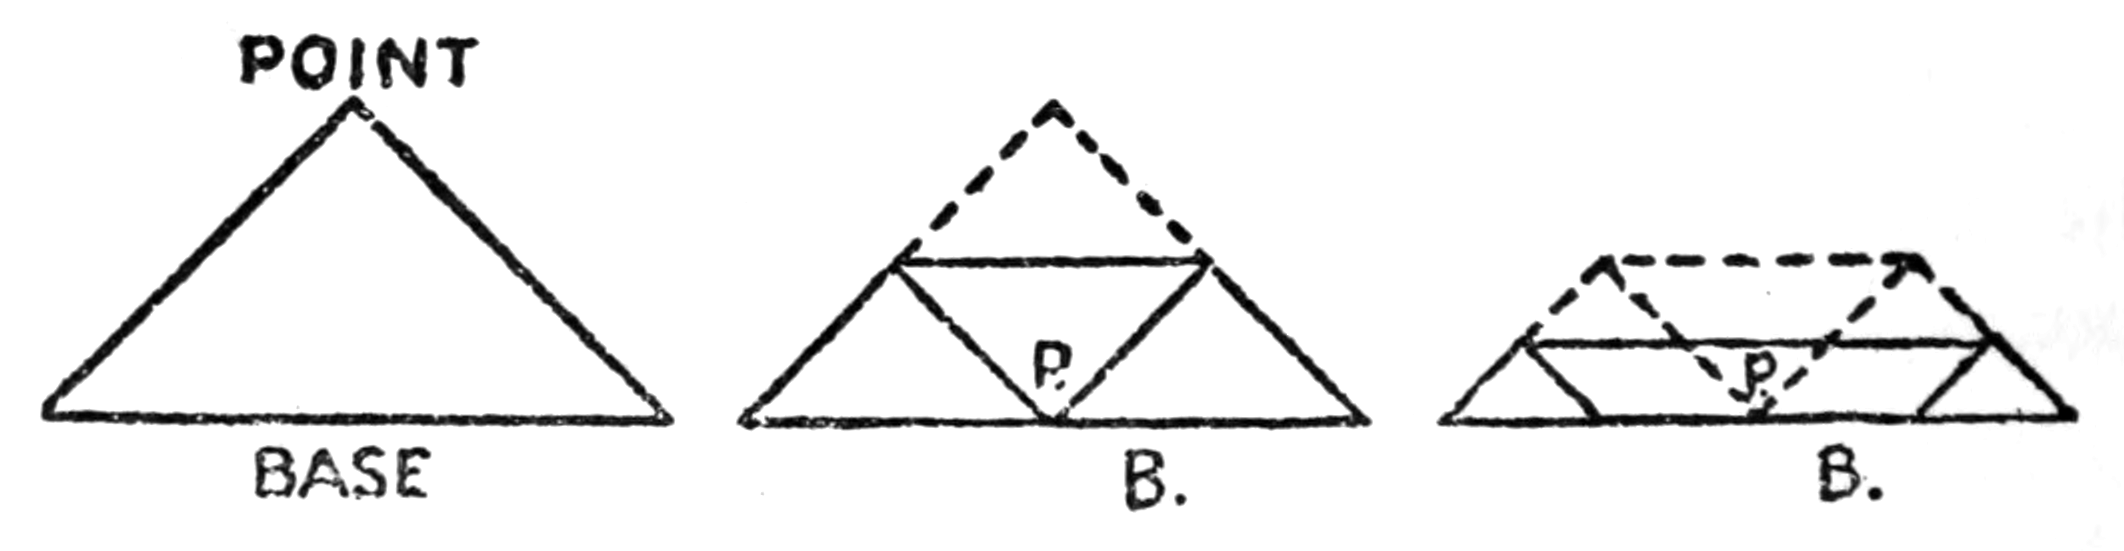
Broad bandage:
Broad bandage is a triangular bandage, because which is folded and used to tie on solints and dressings. First the bandage is fold it in half , point to base, then fold it in hals again.
Narrow Bandage:
Narrow bandage is one or more broad bandage is fold and is mainly used for the collar & cuff sling. First the bandage is fold it in half, point to base and again fold and make a broad bandage. Then fold it in half again. You now have a narrow bandage.
Pad:
if you donot have a sterile pad in your First Aid Kit, you can use a triangular bandage. Then fold the two ends into the middle. Now fold both ends into the middle again. Fold what is left in half to make a pad. The triangular bandage is folded like this, the pad easy to store it in a first aid kit. It is used to controlbleeding.
HEAD BANDAGE
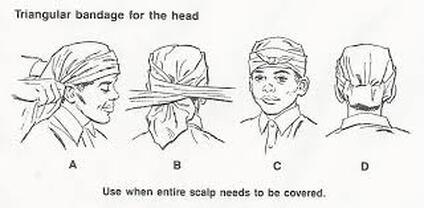
- Stand behind the casualty. Use a triangular bandage as a whole cloth with a narrow hem folded along the base. Place the center of the base in the middle of the forehead, close to the eyebrows.
- Bring the point over the top of the head to cover the dressing, and down the back of the head, cross over the point, and around the head to the front. Tie the ends together, using a reef knot, low on the forehead.
- Steady the head with one hand, and gently pull the point down to put the desired amount of pressure on the dressing. Fold the point up toward the top of the head and secure it carefully with a safety pin or tuck it under the back crisscross.
KNEE OR ELBOW BANDAGE
- Use a triangular bandage as a whole cloth with a narrow hem folded along the base. Place the centre of the base on the leg below the kneecap with the point toward the top of the leg (or to bandage an elbow, on the forearm with the point toward the shoulder).
- Bring the ends around the joint, crossing over the point in front of the elbow or at the back of the knee.
- Bring the ends up and tie off over the point. Pull the point up to put the right amount of pressure on the dressing and then fold it down and secure it with a safety pin or tuck it under the knot.
FOOT OR PALM BANDAGE
- Use a triangular bandage as a whole cloth. Place it on a flat surface with the point away from the casualty
- Place the foot or hand on the triangular bandage with the toes or fingers toward the point, leaving enough bandage at the ankle or wrist to fully cover the part. Bring the point up and over the foot or hand to rest on the lower leg or wrist.
- Bring the ends alongside the foot of hand and crisscross the folded ends up and around the ankle or wrist. Cross over the point and wrap any extra bandage before trying it off.
- Tie off over the point. If the point extends beyond the knot, pull it up to apply the desired pressure. Fold it downward and tuck under the knot.
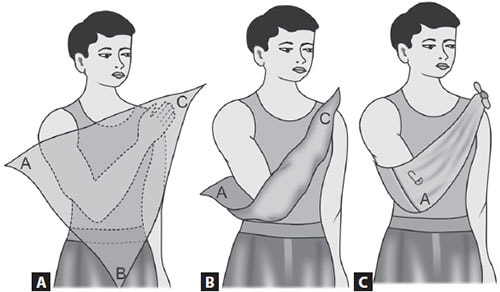
THE LARGE ARM SLING

It is support the injured forearm approximately parallel to the ground with the wrist slightly higher than the bellow. open triangular bandage place between the body and the arm with its apex towards the elbow. The upper point extend of the bandage over the shoulder on the injured side. Bring the lower point up over the arm, across the shoulder on the injured side to join the upper point and firmly with a reef knot. The elbow is secured by folding excess bandage over the elbow and securing with a safety pin.
ST JOHN SLING
It is useful for a casualty with an injured shoulder, collor band,hand or fingures. It is the best sling in a injured parts because it supports the whole arm and takes the weight of the arm off the injured parts. In the case of hand or fingures injuries, it can be used toelevate the injured part.
COLLAR & CUFF SLING

It is usefull for a casualy with a fracture of the upper arm or an injured hand. Allow the elbow to hang naturally at the side and plase the hand extended towardsthe shoulder on the injured side. Then you form a clove hitch by forming two loops. One towards you. One away from you. put the loops together by sliding your hands under the loops and closing with a clapping motion, then apply a clove hitch directly on the wrist, but take care clove hitch not to move the injured arm. Slide the clove hitch over the hand and gently pull it fimly to securew the wrist. Extend the points of the bandage to either side of the neck and tie fimly with a reef knot allow the arm to hang comfertably.
IMPROVISE A STRETCHER:
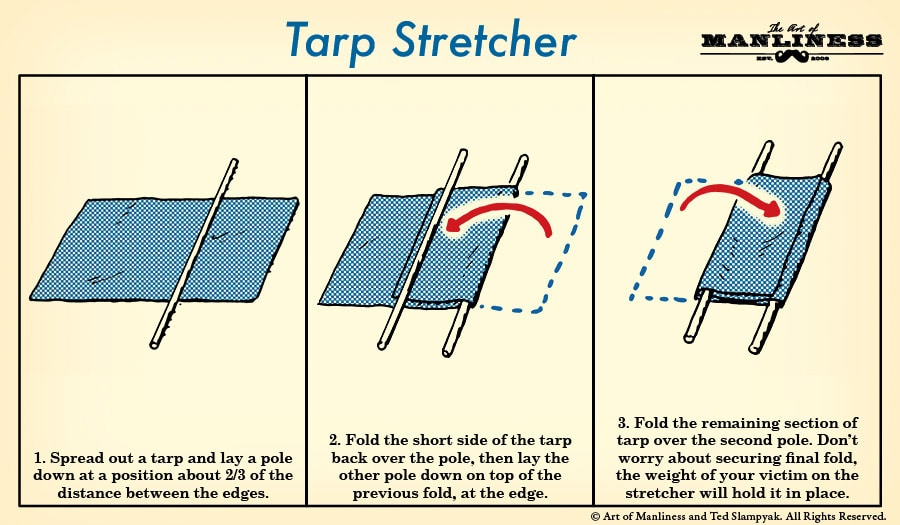
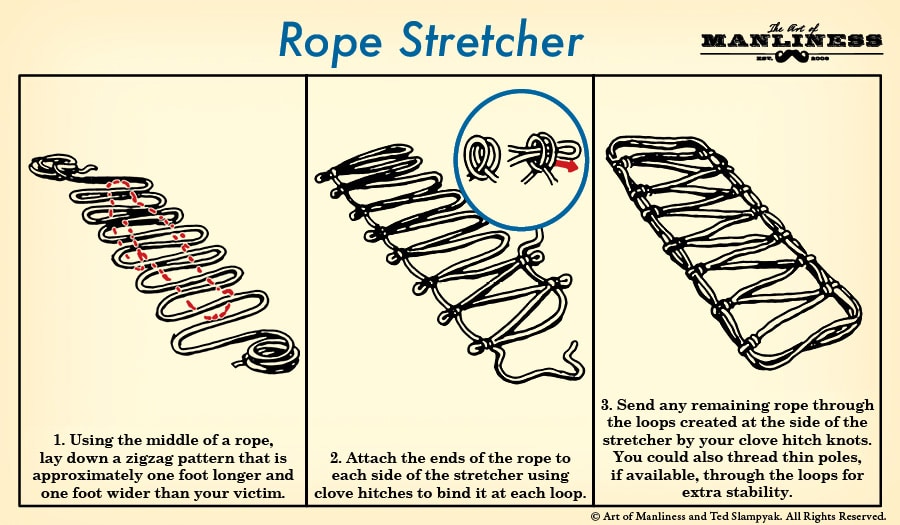
To carrying a casualty many a time we don’t get ready made stretcher. In such cases we will have to come up with innovative ideas and improvise the stretcher. And this of situation we come across always at the time of accidents. To carry the causality we have to improvise the stretcher.
- A window panel, shutter, door panel, covered well with straw, hay clothing and sacking.
- A piece of carpet, blanket, tarpaulin spread out and two staves rolled up on the sides. Put clothes for a pillow.
- Two coats with the sleeves turned inside out; pass two poles through the sleeves; button the coats over them.
- Two poles passed through a couple of sacks, through holes at the bottom corners of each.
