WHIPPING

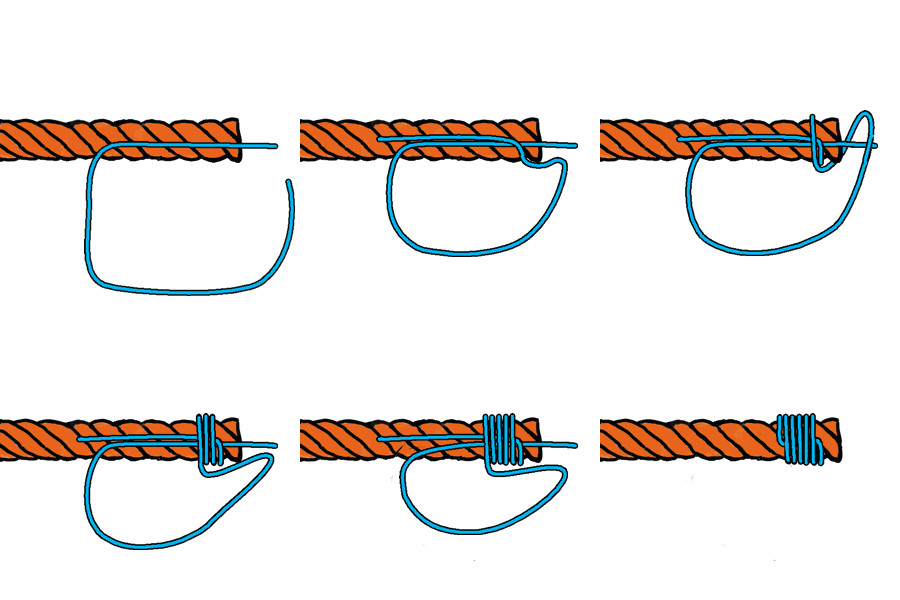
Whipping the end of a ropePurpose: Whip the ends of ropes to prevent fraying and prolongs the life of the rope.
Tying: Lay the twine against the rope and wrap the long end around the rope about 8 turns. Make a bight in the short end. Wrap the long end about 8 more times around both the rope and the bight. On the final turn pass the long end through the bight. Pull the short end to hide and secure the long one. Trim the ends off.
REEF KNOT


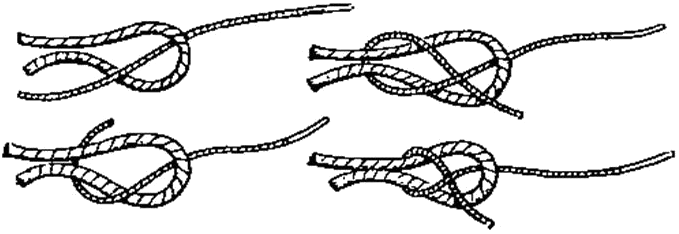
- An excellent general purpose knot for tying two pieces of string or twine together, the reef knot is possibly the most commonly used knot for the job, and is easy to learn. However, it cannot be overly stressed that the Reef knot is not a long term or secure knot, and it should only be used to finish parcels or bindings. In other cases, use a more secure method of bending two ropes together, such as a Sheetbend, a Double Sheetbend, or a Fisherman’s Knot.
- Unfortunately, the Reef knot can easily change into a slipping Lark’s Head (see below), so it should never be used where life or limb are at risk.
- Holding one end of each rope in each hand, pass the left rope over the right, and tuck under. Then pass the same rope, now in the right hand, over the left rope, and tuck under.
- It is common to chant “Left over Right and Under, Right over Left and Under” when tying the knot. (This can also be performed as “Right over Left and Under, Left over Right and Under”.)
- The reef knot can easliy be undone by gripping one loose end, and pulling it back over the knot, in the opposite direction, thus straightening the rope which is pulled. The other rope forms a Lark’s Head knot, and slips off the tugged rope.
- The knot gets its name from its use on sailing ships, when the sails were “reefed” – rolled up and tied to the cross spar with a reef knot. To release the sail, the sailors would climb the rigging, and work their way along the cross spar, pulling the top end of the reef knot down. They only had to use one hand, holding on with the other. The weight of the sail would cause the reef knot to slip, and the sail would be released.
Tip. If you want to tie two ropes together of similar thickness then never use a Reef knot. Only use it with string and twine when tying parcels, whippings and bindings.
Tip. Never use this knot to join ropes of two different thicknesses.
SHEET BEND


- The Sheetbend is commonly used to tie two ropes of unequal thickness together. The thicker rope of the two is used to form a bight, and the thinner rope is passed up through the bight, around the back of the bight, and then tucked under itself.
- The knot should be tied with both ends coming off the same side of the bend, as illustrated here. However it can easily be accidentally tied with the ends coming off opposite sides of the bend, when it is known as the Left Handed Sheet Bend. The Left Handed Sheet Bend is to be avoided as it is less secure.
Tip. If the ropes are of very unequal thickness, or placed under a lot of tension, use a Double Sheetbend.
CLOVE HITCH


- Use to attach a rope to a pole, this knot provide a quick and secure result. It rarely jams, and can in fact suffer from the hitch unrolling under tension if the pole can turn. Often used to start and finish lashings.
- With practice, this can be easily tied with one hand – especially useful for sailors!
Tip. If you are in a situation where the clove hitch may unroll, add a couple of half hitches with the running end to the standing end of the knot, turning it into a “Clove Hitch and Two Half Hitches”!
Tip. When pioneering, use the Round turn and two half hitches to start and finish your lashings instead of the Clove Hitch. It won’t unroll, and is easier to finish tying off. It just does not look so neat!
BOWLINE KNOT

- A commonly used knot to tie a loop in the end of a rope. It has the advantage of not jamming, compared to some other loop forming knots (for example when using an overhand knot on a large bight to form a loop).
- Form a small loop (the direction is important), and pass the free end of the knot up through the loop, around behind the standing part of the rope, and back down through the loop.
- A chant used by many to remember this knot is “The rabbit comes out of the hole, round the tree, and back down the hole again”, where the hole is the small loop, and the rabbit is the running end of the rope.
- In the same way that a Left Handed Sheet bend is a Sheet bend that has the running end of the rope coming out of the wrong side of the knot, a cowboy bowline is a bowline that also has the running end of the rope coming out of the wrong side of the knot. It suffers the same problems as the left handed sheet bend.
- Tip. Don’t be afraid to use this knot to form a loop of any size in rope.
- Tip. To quickly identify if you have tied the Bowline normal or left handed, check to see that the running end exits the knot on the inside of the loop.
- Tip. For added security, finish the knot with a stop knot such as a Figure of Eight knot to remove any possibility of the Bowline slipping.
- Tip. If you use this knot in a man carrying situation – perhaps a rescue where a harness is unavailable – then you MUST use a stop knot as mentioned above.
SHEEP SHANK


- The Sheepshank is a shortening knot, which enables a rope to be shortened non-destructively.
- The knot is only really secure under tension, it will fall apart when slack. (See tip below.)
- Tip. Use up to five half hitches each end of the Sheepshank to make the knot more secure, and for fine tuning the shortening.
- Tip. Never cut ropes to shorten them! Always use a shortening knot such as the Sheepshank, or coil the excess.
FISHERMAN’S KNOT


Fisherman’s knot (Angler’s knot, English knot, Englishman’s bend, Halibut knot, True Lover’s bend, Waterman’s knot)
- The Fisherman’s knot is used to tie two ropes of equal thickness together. It is used by fishermen to join fishing line, and is very effective with small diameter strings and twines.
- Tie a Thumb knot, in the running end of the first rope around the second rope. Then tie a thumb knot in the second rope, around the first rope. Note the Thumb knots are tied such they lie snugly against each other when the standing ends are pulled.
Tip: When tying knots in monofilament line, moisten the line before pulling the knot tight. Th
is helps to stop the line heating up with friction, which weakens it.
ROUND TURN & TWO HALF HITCHES.

- Used to secure a rope to a pole, or to start or finish a lashing. Pass the running end of the rope over the pole twice. Then pass the running end over the standing part of rope, and tuck it back up and under itself, forming a half hitch. Repeat this for a second half hitch.
- This knot has a redeeming feature – it rarely jams!
Tip: Superior to a Clove Hitch for starting and finishing a lashing as the half hitches prevent this knot from unrolling, as they have the effect of locking the knot. The Clove Hitch looks neater (!) but it has a tendancy to unroll, and can be difficult to tie tightly when tying off.
SHEAR LASHING MARK 1 (ROUND OR PARALLEL LASHING)
SHEAR LASHING MARK 2

- Used to lash two poles together (constructing a flagpole).
- Tie a clove hitch round the bottom pole.
- Wind the rope around both six or seven times.
- Finish with two half hitches round both poles.
- The lashing can be tightened by driving a small wooden peg between the poles.
- If possible force a wedge under the lashings to make them really tight.
- If the spars are vertical, bang the wedge in downwards.
